JAPANESE KITCHEN KNIVES
Fun With An Usuba: Sen-Giri And New Ginger
17.06.2016
I’ve been away for a while. Sorry about that! Kyoto’s such a fun city that it’s hard to buckle down and write an irregular column, but I admit that this one has gotten a lot more irregular than it ought to.
As usual, I want to show you a dish that demonstrates some classic Japanese knife skills. For this one, I’m going to emphasize the usuba-bocho, which you’d have to be nuts to use all the time like I do, but has its wonderful qualities.
Usuba Basics: Choosing and Sharpening an Usuba-Bocho
Usuba (薄刃) means “thin blade.” This is because the primary bevel is sharpened at about a 10-12° angle. Since this is a traditional professional knife, it’s hollow-backed, so the other bevel is 0°, making it a very thin knife indeed.
If you’re considering buying one, my first advice is this: don’t. Seriously. It almost always ends in tears. I love mine, but I’m sort of the exception that proves the rule.
But if you must….
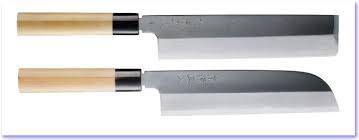
- Get a 210mm blade. Less is harder, not easier. More isn’t necessary unless and until you master the first one.
- Get shirogane (white #2 steel). Aogane (blue #2) is too hard, making sharpening very awkward and difficult; yellow #3 isn’t durable enough.
- Expect to pay $300 US minimum. If you’re paying less, you’d better know a great deal about how to use an usuba and why the product you’re buying is a good choice. A cheap usuba is bad news all around.
- Get a straight ho-wood (magnolia) handle. Don’t get cute: anything else will get in the way unless you’re some kind of idiosyncratic expert.
- You will need whetstones. Very coarse (400), ordinary (1000-2000), and polishing (6000+); it’s best to be able to go above 6000, and you may find that a jump from 1000 to 10,000 is too much. I use 400, 800, 2000, 6000, and 10,000. Soft and muddy is your friend, especially from 1000 upward. Don’t skimp on the coarse stones: you will chip the thing quite a lot, especially as you are getting started learning, and that means a lot of careful coarse grinding.
The blade of an usuba is die-straight, or ought to be, from tip to heel. This means that if you cut in the usual way on a board, with that cycling, oval motion you use with a chef’s knife for instance, you’ll immediately dig the tip into the board. And the blade is so thin and hard that you’ll crack it right off. So you can’t cut that way. (Note that a Kanto-style usuba is a little more forgiving about this, as the tip is slightly rounded.)
Bear in mind that while the primary bevel is 10-12°, there is no secondary bevel. It’s straight right down to the edge. It should be sharpened as sharp as it can get, and polished within an inch of its life. The edge must be as frighteningly sharp and polished as you can make it.
There are ways of cutting on a board, of course. Mostly it’s push-cutting: the blade moves very slightly forward, keeping the edge parallel to the board, and you drop through the vegetable evenly. But an usuba shines when used up off the board, and that’s what I want to talk about here.
Sharpening an usuba is both easier and harder than other knives. The whole bevel is flat, so you just lay it right on the stone and start grinding. No worrying about angles or shaping or tips or anything, just gently back and forth on a nice muddy stone.
But when I say gently, I mean gently. Go slow. That huge bevel is going to stick like mad to the stone’s surface, and if you’re not careful it will stop hard. If you’re going fast, your fingers will pull back off the steel, then push right back into it. If you can imagine putting your fingers through the thinnest, sharpest mandoline in the world, you can see why you don’t want to do this.
For more information about sharpening, ask one of the real experts here at KnifePlanet—I’m not that guy. I do fine, but I’m no sharpening master.
Okay, on to cooking.
Mastering The Cross-Slicing Technique (sen-giri, 千切り)
The big technique for today is cross-slicing. The Japanese term for this is sen-giri (千切り), “thousand-cuts.” If you’ve never done it before, it’s easiest to start with a small potato, which I’ll use for demonstration purposes here. See video:
![]()
First, cut the vegetable crosswise in the middle somewhere, to create a stable platform. Then stand the vegetable on that flat surface. If it’s not round, its long axis should point straight away from you, not side to side. (Incidentally, I use the word “vegetable” advisedly. Do not ever, ever cut anything else with your usuba.)
Put the first one or two fingers of your left hand on top of the vegetable, right at the tip. (I’m going to assume you’re right-handed; if you’re a southpaw, reverse all this.) Until you’re really good at this, it’s best to put your left wrist on the board. Your left fingers should be crooked up in an arch.
Hold the usuba so that the base of the spine rests in the lowest joint of your middle finger, the ring finger and pinky curved gently around the handle. Your index finger should be curved around the face of the knife, and the ball of your thumb is flat in the middle of the back, the thumb itself curved just a little bit. Your thumb and forefinger are thus pinching the knife gently. Don’t grip hard: a gentle touch is necessary. Gently, place the edge, just behind the tip, a hair underneath your left index finger. The whole flat of the knife should be parallel to the board, the edge pointing straight away from you. You should be working so that the vegetable is more or less in line with your belly button. Keep your shoulders down, neck gently bent so your head looks down at the work. Your left foot should be pointed at the counter, your right a little back and angled out about 45 degrees or so.
The object is to push the knife forward until you get a little past your thumb, keeping the bevel parallel to the board. At that point, you should be ¾ of the way through the cut. Now ease the tip to the left maybe 20-25 degrees and pull back straight. That is, on the return stroke, the tip and heel should remain exactly where they are left and right, and the blade should shear through the vegetable. The tip should end in the hollow created by your left hand’s arch. Your right thumb is the controlling digit here. Bear that in mind: if you’ve used other knives (as of course you have), you’re used to controlling the blade with your forefinger. The whole maneuver is one smooth motion, not stop-start, which takes a little practice.
If you have executed this perfectly, you will have a hair-thin disk of vegetable sitting on the hollow back of the usuba.
With a small amount of practice, you will see that with a tiny bit of pressure from the left index finger at the end of the return stroke, you can leave that slice on top of the vegetable instead of on the knife. If doing this, the slice should end up just slightly to the left of where it started, with the index finger touching where the cut began.
Now repeat the motion, many many times.
If you’re really good at this, you can quickly transform a potato into a perfect fan of hair-thin slices lined up under your left hand. You will find that when cutting slices at speed, or with a tall vegetable, it is best to lift your left wrist well up off the board and bend your fingers backwards a little bit, but don’t try to start that way. Take it slow and easy, and establish good habits.
With some vegetables, especially tough ones, there’s always some tendency to get slightly uneven cuts. If this is happening, leave the current stack on the knife, slide it off to a dish, and then flip the vegetable over on the board. This tends to even out errors, which otherwise tend to magnify over time.
Obviously, you can using this technique decide how thick you want your slices, which way to cut them with respect to the vegetable’s grain, and so on. For instance, you could cut a length of fat carrot and stand it on end, producing disks, or you could split the same piece lengthwise and take off sheets in line with the grain. It depends what result you want.
A great way to practice is to make potato chips. Potatoes are forgiving, and you can really see the blade through a good thin slice. Once you’ve turned a couple pounds of potatoes into beautiful chips with your usuba, you’ll get how this works. Keep doing that every day for a few months, processing maybe 5-10 pounds of potatoes, and you’ll sneer at a mandoline. (You’ll also sneer at my mediocre skills, of course.)
Julienne
Once you’ve got your potatoes in a stack of thin slices, fanned out under your left hand, making a julienne is a walk in the park. This is called ken (針) or needle-cutting. Since the vegetable is already in very thin sheets and spread out neatly, you can simply push-cut your way from right to left. Just remember that the knife’s edge must remain parallel to the board at all times. The fact that you don’t have to cut down very far, and that the vegetable is already cut, means that the weight of the knife will do the majority of the work. A very light touch is the key here.
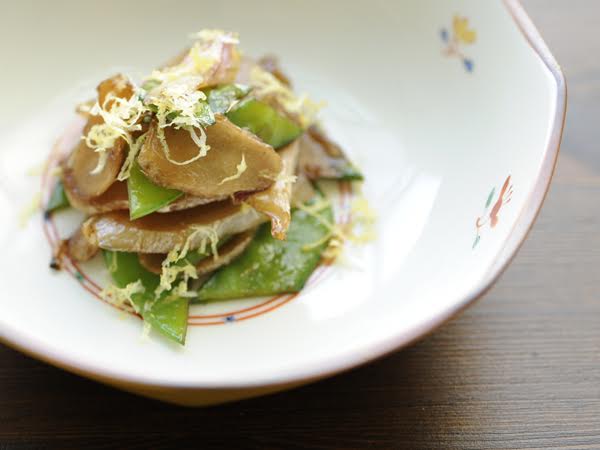
New Ginger Kinpira (新しょうがのきんぴら, shin-shoga no kinpira)
Usually, kinpira means thick julienne of tough vegetables (e.g., gobo and carrot) stir-fried together, with a bit of hot chili flakes. This dish has few of these qualities, but nevertheless that’s what it’s called.
This is in many respects a very simple dish, and a great introduction to basic Japanese cooking. It’s nothing more than a stack of hair-thin wafers of new ginger (also called young ginger) simmered for a while in a basic simmering mixture, with fresh edamame, garnished with hair-fine julienne of myoga.
The trick, of course, is that you have to cut the ginger into super-thin disks. Now I realize that you could be a big cheater and use a mandoline, but if you’re that sort of person you shouldn’t be reading this. (Actually, go right ahead, but don’t tell me about it.) Once you’ve got the disks, the rest is trivial.
Ingredients:
- 1 big chunk (~2/3 pound) very young ginger (it should still have pink tips and look pale, almost white, not brown)
- 1 small handful fresh edamame (or frozen shelled ones, still frozen)
- ½ head myoga (茗荷, みょうが), so-called Japanese ginger (if you can’t find myoga, substitute scallion, chive, or more ginger)
- ½ Tb neutral cooking oil
Tare simmering mixture:
- 1½ tsp usukuchi (薄口醤油) soy sauce (thin, pale-colored, very salty)
- 3 Tb sake
- 1 Tb sugar
Wash the ginger well, and trim off any bits that seem old, tough, or dry. Cut it into a few sections by cutting through the fattest parts, crosswise to the grain. Cross-slice the ginger into translucent disks, cutting with the grain. New ginger is much softer and less woody than regular ginger, but it’s still a bit tough, so be careful: if you push rather than slice, the blade can jump into your hand. (Note: if you’re going to try this with regular, tougher ginger, you’ll need to cut against the grain so the slices won’t be tough—and that will make cutting a good deal more difficult.)
Heat the oil in a wide sauté pan. Spread the ginger disks in the oil, trying to make sure they’re not all stuck together in a mass that won’t cook nicely. Stir-fry for about 1 minute over medium heat to soften and get translucent. Add the soy sauce, sake, and sugar, and bring to a boil, shaking to distribute the sugar evenly, then reduce to a simmer and cover.
(This process of cooking in a simmering liquid under a lid until you’ve just got a sauce produces what are called nimono (煮物), simmered dishes, one of the core categories of traditional Japanese cuisine.)
In about 5 minutes, when the bubbles in the liquid are starting to get fatter, meaning it’s pretty well reduced and the sugar and starches are starting to thicken, remove the lid and throw in the edamame. Shake a few times. Put the lid back on for 3-4 minutes. Once the edamame are barely cooked, uncover the pan, turn up the heat to high, and boil away the rest of the tare, shaking regularly so it doesn’t scorch. There should be just a little thick sauce in the bottom. Pour the mixture into a bowl and let cool to room temperature.
Variation 1: Substitute peas, snow peas, or fava beans for the edamame.
Variation 2: If you happen to spot little live clams, buy a generous handful. I mean little ones, not much bigger than your thumbnail. Wash well in cold running water, and discard any with broken shells. Throw in with the edamame; they should open when the edamame are ready.
When you’re ready to serve, choose a small, pretty bowl. Stack the slices in an attractive mound in the middle, sprinkle the edamame around the outside, and pour the remaining sauce over the top. Cut the myoga into hair-fine julienne, about 2-3 inches long (5-8cm, the lengths of the myoga bud), and make a little bundle on the top. (The easy way to julienne myoga is to cross-slice the whole piece finely, then trim off the root end; the thin shreds will fall apart naturally.)
Serve at room temperature, with steamed rice.
This is fabulous drinking food, the kind of thing you might get served in an izakaya, a restaurant-bar. As a regular meal dish, it’s best to think of this as one of several sides, served family-style from a bowl in the middle of the table. The taste is rather hard to describe, but it’s about as distinctively Japanese as it’s possible to get.
Takes beer bites to quite another level.
And speaking of izakaya, when you leave one in Kyoto, they always say the same thing: ōkini!